© 2010-2022 Y Us Sdn. Bhd. All Rights Reserved.
Evenesis
  • Services
    • Event
      • Event Registration & RSVP
      • Hybrid Event
      • Virtual Event
      • Database Management
      • Integrated Email / SMS Blast
    • Management
      • Facial Recognition Check-In
      • Integrated Online Payment
      • Event Analytics
      • Event Mobile App
      • Lead Tracking App (Evelet)
    • Solutions
      • On-Site Check-In
      • Event Web Design
      • Live Q&A & Polling
      • Business Matching
  • Resources
    • FAQs
    • Blogs
  • Events Near You
  • About
    • Us
      • About Evenesis
      • Certified Partners
      • Career
    • Y
      • Testimonials
      • Media & Awards
      • Case Studies
  • Contact Us
    • Contact Us
    • Get a Quote
Get a Quote
Sign in
Create an event
Evenesis
Create an event

4 Steps to Make Your Event Invitation Stand out

Home / Blog / Evenesis Updates / 4 Steps to Make Your Event Invitation Stand out

4 Steps to Make Your Event Invitation Stand out

Email is regarded as one of the most effective ways to invite event guests, though the results of an email invitation can be very hit or miss. Some emails are never opened. Others are, but don’t convert to event sales. So how to make your event invitation stand out?

Evenesis enables you to personalize each email invitation, customize email design, collect RSVP updates in real time. See, it’s easy to be done, with only 4 steps.

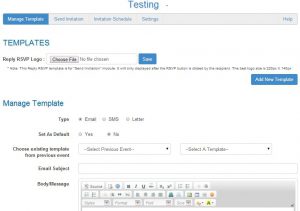
Step 1: Create your email template 

Upload your “RSVP” logo. Choose existing templates from previous events if you have. Otherwise, start to create the template.

Maximize the body window to better insert your invitation text, images, links, tables, etc as email body.

You can also click “Source” to design the invitation with HTML code. Save template when you are done with this part.
event invitation

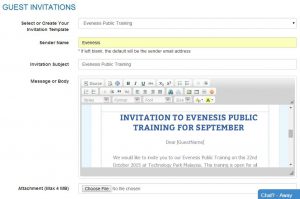
Step 2: Choose your event invitation

Click to “Send Invitation” and select your email template from the drop down list.

Choose the attachment if needed.

Choose a background template for your event  invitation or you can choose no background template.
event invitation

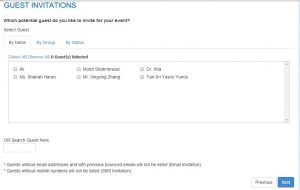
Step 3: Send the email invitation

Select your recipients or guests by name, group, status or using the search function.

Preview the email, the RSVP(Yes and No) button is automatically attached at the end of invitation.

Then select to send your email immediately or schedule it at a specific time and date.
event invitation

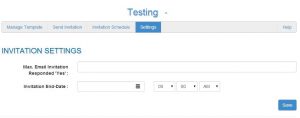
Step 4: Monitor your event invitation

You are able to check scheduled list in “Invitation Schedule”.

Set the maximum number of receipt that can attend to your event by clicking “Yes“.

You can also set the end-date to RSVP your event.

To check the email delivery status and guest attending status, go to Report module, check the email tracker and database tracker. Or filter guest status in Database module.
event invitation

Evenesis – the most powerful event registration & management platform for all your event needs. Interested to know more about us? Click to request a free trial or call us at +603 8992 3132.

event invitation

Eevenesisevent management solutionevent marketingevent planning tipsevent registration system
137
Like this post
  • How to Manage Your Guest Database?
    Previous PostHow to Manage Your Guest Database?
  • Next PostTop 5 Event Planning Mistakes
    How to Manage Your Guest Database?

About

  • About Evenesis
  • Media & Awards
  • Testimonials
  • Career

Resources

  • Certified Partners
  • FAQs
  • Blog
  • Videos
  • Case Studies

Our Offices

Y Us Sdn Bhd (888985-V)
1-2B, Hive 6, MRANTI Technology Park,
Bukit Jalil, 57000 Kuala Lumpur, Malaysia

Y Us Pte Ltd (201432939M)
60, Paya Lebar Road #11-01,
Paya Lebar Square Singapore 409051

Contact Us

Email: contactus@evenesis.com
Phone: +603 8408 2112 / +65 8228 2084

Subscribe to newsletter

Event Management Software Event Management System Event Registration
Event-Management-System-Evenesis-white-logo

© 2010-2023 Y Us Sdn. Bhd. All Rights Reserved. Terms and Conditions & Privacy Policy

Copy